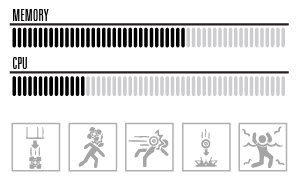
Portal 2 living desktop background
httpv://www.youtube.com/watch?v=lIJoURrerNs
A brief story
This seemingly small project contains 3 parts: Geektools coding, background graphics, and a new font.
It started a while back with me seeing a someone who made a portal 2 door poster. I was unable to get my hands on the vector graphics so I decided to make my own. I took photos of portal 2 using a handheld camera, imported the photos into Illustrator and started tracing the outlines. After a while I had something that looked like a real poster and used a giant printer to produce this:
Some time later I was getting into Geektool and looking for so called geeklets: finished snippets of code ready for download. I’m not really a programmer and quite like cool stuff that works with minimal effort. I stumbled across a geeklet by a guy called JimmyBollox (^^) at www.macosxtips.co.uk/geeklets/system/system-info-circular-graphics
As the link implies, he had made some circular graphics which were able to show things like your CPU and Memory usage. To accomplish this he had made his own circular graphics font which corresponded to a certain percentage with a being 0% and Y being 100%. I thought that was a really neat way to do, escpecially since I can’t code.
I downloaded his code snippets and decided I’d make my own font that would look more like a standard progress bar and fit in with the Portal 2 theme.
I made some really simple bars in Illustrator and got stuck when it was time to transform my graphics into a font.
I tried so many different types of software: ScanFont, TypeTool, RoboFont, Inkscape, FontLab. I’m sure there were others but these are the ones I remember from the top of my head. All the fonts exported had errors I couldn’t figure out and were seemingly random. I put a lot of hours into this and even asked for external help, but to no avail.
Then, suddenly, 6 months later, I discovered software previously unknown to me called Fontographer 5. I gave it a go and it worked out of the box. I simply copied and pasted my graphics into the corresponding letter, hit generate font files and that was it. The new font worked exactly as it should and I was finally able to setup this sweet living desktop background.
Download font
Font 1 a: progress bar with full steps (this is the one I used)
Font 1 b: progress bar with semi steps (if you prefer semi steps)
Font 2: Zurich Light (for the date and time text and numbers)
Download background
2560 x 1440
1920 x 1200
1920 x 1080
1680 x 1050
1600 x 1200
1600 x 900
1344 x 756
1280 x 1024
1280 x 720
1024 x 768
800 x 600
If you’d rather make adjustments to the background feel free to use my original Illustrator vector graphics.
Download geeklets
Geeklets.zip (updated October 25th)
Tutorial (text)
Step 1) Go get Geektool at the Mac App Store if you haven’t already.
Step 2) Download Font 1 and Font 2 from this page. Open Font Book on your Mac and click and drag the fonts into that program. The fonts are now installed and you can use them in all your software.
Step 3) Download one of the backgrounds, whichever fits your screens resolution. If you have another settings or want to change the appearance, feel free to download the Illustrator file instead.
Step 4) Save the background where ever it suits you. Right click the file and choose Set Desktop Picture.
Step 5) Download all the geeklets by right clicking the Geekelts.zip file and select the equivalent of “save as”.
Step 6) Doubleclidk the ZIP-file to unarchive it. Install the geeklets by doubleclicking them and answering “yes” when you’re asked if you really want to open the files.
If the popup window is so large that the YES and NO button is pushed outside of your screen, the follow Tucker Chapin’s instructions:
Go to System Preferences > Keyboard > Keyboard Shortcuts Tab and select “All controls” rather than the default of “Text boxes and lists only.” Then when the popup comes up hit TAB then Enter to select “YES”.
Step 7) If you have installed the 2 fonts and used the same background as I (2560 x 1440), the geeklets will probably look fine. If not, you’ll have to adjust their position and possibly font. You have to first highlight Geektool if you want to change any of the geeklets, so click the app icon once, then the geeklet you want to change. You can now click and drag to move it around or enter a X and Y position manually. You can of course also change the font with the font button.
That’s about it, I guess. You could open up Activity monitor and see if the readings match. The Memory meter is showing the value of Used memory which is (Wired + Active + Inactive) and the total is Used + Free. When you’re all done you can delete the geeklets, but I suggest saving the desktop image somewhere.
Tutorial (video)
youtube.com/watch?v=Sz_KGMwS6rA
Problems?
Problem 1) I can’t open the geeklets after I’ve downloaded them. “I have GeekTool running but it says that it cannot open that type of file. However my icon for the Geeklets is just blank white unlike your in the video.”
Solution 1) Max Pillong says: Simply open up GeekTool and create your own Script Geeklet (The content doesn’t matter) and save it. After this it should recognize the extension .glet to be opened with GeekTool.
Problem 2) The popup window is so large that the YES and NO button is pushed outside of your screen.
Solution 2) Tucker Chapin says: Go to System Preferences > Keyboard > Keyboard Shortcuts Tab and select “All controls” rather than the default of “Text boxes and lists only.” Then when the popup comes up hit TAB then Enter to select “YES”.
Variations on this theme
JordoTron i.imgur.com/if6T4.png
Matt Fairbrass imgur.com/gYBBv
@CompendiaryMe twitter.com/CompendiaryMe/status/260452060833660928/photo/1
Sean Dohring i.imgur.com/6HapB.png
Note 1: I only used 2 of the geeklets www.macosxtips.co.uk/geeklets/system/system-info-circular-graphics provided. If you want you could simply go there and download the others and change the font to my progress bar with full steps.
Note 2: THANK YOU Max Pillong for fixing the code issue that showed incorrect readings when you have more than 10 GB RAM. You solved the final piece of the puzzle.

I don’t often look into random google images, but when I saw the portal theme and accompanying video I had to give your theme a try. This is my first attempt at making a dynamic wallpaper let alone using geektool and your instructions were GREAT! At some points I wasn’t sure how to figure out what to do (like downloading the geeklets or getting the Zurich Light font), but in the end it helped me learn how to use the software and I feel much more confident in using it now. Thank you for the great afternoon project!
I love the setup you had, but wanted to have a clock as well so I changed it up a bit for my preferences. Here’s a little look see at my finished product.
http://i.imgur.com/if6T4.png
The background is a little misshaped on my 13-inch macbook screen, but it still looks pretty good to me! I also had the grey bars working on the CPU geeklet, but the grey for the memory geeklet covered the actual black bars so I opted for the no grey version (If you can see what I’m doing wrong please let me know!)
Thanks again for the wonderful way to convey my passions and I will be a close follower of your work from now on!
Hi JordoTron!
To make things a bit more clear for anyone else trying: I think you just have to download the geeklets and then doublecklick them, right? That should open them in Geektool.
About the grey bars that I have underneath, it’s a bit tricky to get them to match but if you try again you can right click the grey bar and choose “send to back” which will put it behind the black bars.
– What’s your screen resolution? I could make a background that better suits your screen. I’m just so happy that someone else liked this theme!
Also, was there anything else tricky that might need explaining for the next guy trying this?
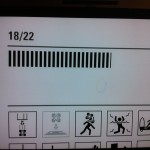
I cannot seem to get the RAM to report properly.
I loaded the font and the geeklet. but get an output of X62X…. I have 16GB of ram installed on my machine in 2 8GB sticks.
actually im watching and it seems to be floating between 61 and 62….
i checked activity monitor and that is what the percentage of my ram being used is. it must not be substituting the correct number for the value.
Sean, I’m afraid you’re right. I didn’t do the code myself but used the same code as you can find at the very top link. It seems as though several people commented on the same thing on his page about getting incorrect readings on both RAM and CPU. Some were able to fix it with adjustments to the code but I wouldn’t be comfortable changing these geeklets until I first fixed it on my end.
Please have a look at http://www.macosxtips.co.uk/geeklets/system/system-info-circular-graphics/ and see if their advice helps you!
I’ve asked @JimmyBollox on Twitter if he could have a look at your questions here. I hope he’s able to help!
I just doublechecked the RAM issue to be sure. I used Jimmy’s geeklets for ‘inactive memory’ and ‘active memory’, used a its default font and the result came back as ‘J’ and ‘P’ which corresponds to 70% and 82%.
The start of the command in the geeklets:
top -l1 | grep “PhysMem”
show the correct readings in Terminal if you run them there, so I am pretty sure that there’s a mistake somewhere in the code that turns the value into a corresponding letter. Anyone dare to guess on what the mistake is?
I remade the CPU reading with the following code: top -l2 | grep “CPU usage” | tail -1
Not being a coder, I think it means it makes 2 readings of the CPU usage, but only displays the second reading. It works much better for me. For some reason the first cpu reading was always to high. See for yourself by pasting these commands in Terminal on your Mac:
top -l1 | grep “CPU usage”
or
top -l2 | grep “CPU usage”
I also remade the Memory geeklet. It’s a much longer story so I think have to make a full blog post about it. In any case, it now displays the “used” memory (Wired+ Active+ Inactive) divided by total RAM.
I wrote a more detailed tutorial and made a 10 minute YouTube video for those that prefer that kind of thing. I hope you like it!
Really cool. You inspired me to make my own (http://imgur.com/gYBBv) with a few minor tweaks. I knocked out the first two squares from the background image to make space for two new geeklets which query Accuweather to display the current weather via an icon and the temperature (see http://alexonsager.net/2010/06/my-geektool-desktop-functionality-with-style/ on how to do this).
With regards to the Memory indicator not working correctly I think I worked out why this was. The $10 var from grep is the amount of memory left available which on my system is 12GB (I have 16GB in total). $8 is amount in use, which is returned in MB, not GB. So I simply multiplied $10 by 1024 to give me the amount of memory remaining in MB.
Here is the line in full, the rest of the script can be left as it is:
USED=`top -l 1 | grep PhysMem: | awk ‘{print “X”int($8/($8+int($10*1024))*50)”X”}’`
This seems to have done the trick for me. Hope it helps someone else. Anyway, great project!
Oh, those two geeklets are awesome!
Hold on, about the $10 variable… Do you get that written i GB? Both $8 and $10 is reported as MB on my system: right now it’s 699 MB and 3391 MB.
Do you think it has something to do with two RAM sticks, or getting over 9999 MB (too many numbers), or related to the OS? I’m on Mac OS 10.8.1, it that helps anyone. It would be really helpful to figure out why there’s a difference.
Also, thank you for the encouragement!
Andreas,
Thanks for an awesome tutorial! I have seen a few active/living desktops that I have wanted to replicate, but I have neither the experience nor time necessary to do so. You made this really easy and incorporated a theme that is outstanding. If you have some time, make another Portal themed living desktop! A few friends in law school saw my desktop after I finished up with your how-to video and are looking into similar solutions for their desktop backgrounds.
Thanks,
Marcus
Thank you! ^^ I’m so happy this is useful to more people than myself. I’m not sure what another Portal desktop would look like. This one came out of seeing the test chamber sign and dreaming about the bars moving. I don’t think I can force myself to make a new one without first knowing where to aim. But I can tell you this, I have been looking at a lot of gaming related backgrounds. I think my next step will be to make something out of Street Fighter 2 with moving health bars, but the screenshots I find are of really crappy quality.
As a major fan of Portal, this thing is amazing. Sadly I use Windows though, :(.
Either way, great job on it. I truly love it! Just out of curiosity, how long did it take you to complete the project?
Sadly? You guys have Rainmeter, have you checked it out? It seems so much better than Geektools, I’m really envious of that program. I think I actually made this out of a desktop I saw in Rainmeter but it was so long ago I can’t remember for sure.
It took me forever to do this, mostly because I couldn’t finish the font. It wasn’t until after 6 months I finally discovered font software that could do what I wanted. But as for hours… Way too much. It was a lot of trial and error, mostly errors 🙂
I’d guess making the font took me 50 hours. The geeklets took me maybe 30 hours. The background which is a handmade vector image maybe took 10 hours.
If I however had to make it from scratch today it would be sooo much simpler. Maybe… Font: 1 hour, Geeklets: 1 hour, Vector image: 1 hour.
I should inform everyone that I have the same issue as Matt.
I upgraded my RAM from 4 Gb to 12 Gb and my free memory displays incorrectly. It goes from 9999 Mb to 10 Gb. If one of you could help me find a way to force the number to be written out in Mb I’d be very grateful.
Thank you YouTube user dimezakk who took the time to solve the MB to GB issue! Now the geeklets always shows MB, even when passing from 9999 to 10000.
For some reason, I can’t get the labels to show up over the CPU and Memory Geeklet. Otherwise everything is perfect. Am I doing something totally wrong? Thanks so much.
Oh, sorry about that Sarah. They are separate geeklets containing only text, so I didn’t feel the need to upload them on the site. Just make a new Shell geeklet by clicking and dragging on to the desktop and write CPU and Memory in the “override text” field. Does that work?
And then change the font to Zurich Light if you like how the Month, Day of month and Weekday is displayed.
Yes, thank you! Sorry this is my first time using Geeklet so I am learning while doing. Your tutorial made things so easy.
Thank you! ^^
First, this is brilliant, so I’m trying it myself for the first time. I’m having issues with the geeklets, and I’m not even sure if you can help me.
Every time I try to open the geeklet for GeekTool this comes up, “GeekTool cannot open files of this type.” I’ve uninstalled, and reinstalled GeekTool a couple of times and that didn’t fix it. I’ve tried renaming the file after getting it from Safari and also got them from Chrome. I’ve even tried deleting the .lockfiles as someone suggested elsewhere. I’ve googled, and there isn’t much help.
Is anyone else at least having this problem?
Nevermind. If anyone else has the same problem, you right click (or control click or whatever) choose “open with” and click on “GeekTool Helper.” Worked fine with that. For some reason the first couple of times around the GeekTool Helper didn’t pop up for me. This time it did.
Oh great, I was just writing you a response, about to post the complete Command code so you could make the geeklet from scratch. This sounded easier!
Yep! Not a problem after that! The only thing I had to do was adjust the font and the bars. The size was huge for my screen, but other than that, easy peasy!
Thanks!
Hello this is completely amazing in every way possible. Props to you my good sir. However, I am having one problem and one problem only. When I open the MEMORY window with the code in, the window is literally too long for me to click YES rather than the already highlighted NO. I’ve tried every MAC shortcut, from rotating windows to shortcuts, to trying to minimize the window. Is there any way you could help me out with this situation? The only thing I can currently think of is hooking my Macbook up to a larger monitor, but I don’t have the cables to do so, seeing as Macbooks don’t have an HDMI port…
Your help would be much appreciated! Thank you for your skill and time!’
-Brad
Ok, this is probably a dumb question so I apologize. I have everything working except the memory one. When I double click on it I get the window asking me “yes” or “no”, but the buttons aren’t visible on this one because the window is too large. I’ve tried resizing my screen, the window itself isn’t resizable… can’t get to the Yes button. Any ideas? Here’s a screenie: http://cl.ly/image/0u1w2s3J0t0y
Not dumb at all. Today I got help fixing a bug in the script, and the resulting code was made twice as long. I see your point. I couldn’t use any key combinations myself to answer “YES” at the popup. I blame Geektools but that doesn’t help anyone.
Does it work entering the code manually in a new geeklet like mentioned above?
Where do I actually enter the code? WHen I drag a new shell to my desktop it brings up the Geeklet Properties window – where does the code go?
Thanks so much for your help!
Oh, I should also say — THIS IS AWESOME. And thank you for taking the time to blog about it and provide such great instructions. The internet loves you for it! 🙂
Renae, you enter in where it says “Command:”. Make sure you set a refresh rate too, otherwise it won’t update.
Ok, that’s what I thought – didn’t see the trailing “…” after the Command field to open the editor. The code you provided doesn’t work, even after setting a refresh rate, but that’s ok. I can operate without the memory glet! 🙂
Hello, what you made is very cool, and i love how it looks! I’m sorry if this has been asked already but when i click to download the geek let, it takes me to a page with a bunch of code on it, but it wont actually download it. What do you think is should do?
Riley, I hope it’s as simple as right clicking the ZIP-file and choosing something like “save as”. Does that help?
Thank you, it all works now! You did very well on this.
FYI, about the issue with hitting “YES” to the memory geeklet popup, go to SysPref>Keyboard>Keyboard Shortcuts Tab and select “All controls” rather than the default of “Text boxes and lists only.” Then when the popup comes up hit tab then enter.
THANK YOU, Tucker! Not only does it solve this problem, but it’s something that has annoyed me for years. It’s like removing a splinter I’d forgotten I had.
Haha, no problem. I love Mac, but it does have some annoying, quirky presets like that.
Here’s my twist on this wonderful desktop: http://i.imgur.com/6HapB.png
I started trying to find an icon set that I could use with the AccuWeather API as Matt Fairbrass did in his screenshot here (http://i.imgur.com/gYBBv.jpg), but I couldn’t find an icon set that covered all of the required icons. I couldn’t find a complete one, so I made my own partials and modified acweather.rb to prepare the 8 partials depending on what “status” accuweather returns. The sun, moon, and lightning bolt can be on or off, and all of the others have four states including off.
And I left in the cake, because, well… come on. ;D
I’ve made a new ZIP. It now contains everything, so you don’t even have to enter the plain text geeklets. The new code is provided by Max (thank you so much) which means even small screen resolutions can open the geeklet. I tested it on 800×600 and the popup window fits the screen.
I’m happy, and I hope everything works out for you!
Hi! I’m having some trouble getting this to work. The geeklets wont open up in Geektool. It says it can’t open that type of file. What do I do?
Katie, I think your question is answered under the heading Problems. I haven’t experienced it myself though.
Pardon the dumb question but… I’ve set it all up (11″ MB Air) and the CPU is wayyyyyy past the length I want it to be, so to fit it either is a really small font, or it goes past the black bars. How do I resize it but still make it accurately portray the percentage of the CPU being used?
Hmm, I’m a bit unsure if understand correctly. You can resize both the grey bar in the background which represents 100% and you can also resize the black bars that move. They are both fonts which you can change with the font button. Could you send me a screenshot if I mistunderstood you? I’m sure we can figure this out.
Here is a link to two pics (http://imgur.com/a/C2jPn).
In the second picture you see how far it is extended without boundry. The thing is when you resize, if it shows all black bars that doesnt mean its 100% CPU it only means its >50% because resizing doesn’t get rid of it, it just hides.
Im not completly sure how it works, but lets say if 5% CPU is used up it shows one black bar and their are twenty bars, if I want only ten bars, I need to reduce it so that 10%CPU is one bar. How do I do that?
(In reality I have 26 bars showing out of 59 [If I didnt miscount, I may have])
I think the confusion is the progress bars being a font. It won’t help you just resizing the box that the progress bars are in, you’ll have to select the progress bar geeklet and then to go the font selector and change the font to something smaller. I think the default is around 60-70 and with your resolution you’d be better off with something like 20. Does that help?
There’s no easy way of having fewer bars (1 for 10%), you can only make them appear smaller. This is due to them not being graphics, but a font. As it is now, 1 bar represents 2%, I think, and each bar is a letter: a-z and A-Z.